Replace board in panelA board may be replaced in a panel. To do so take the following steps:
|
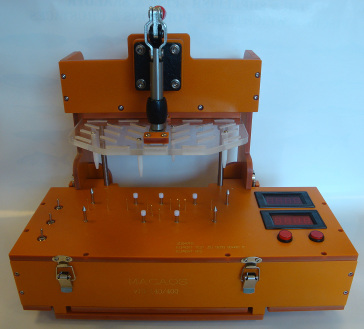
Test fixture improvements Macaos Standard JigThis version supports the Macaos standard test jig. The Macaos standard test jig is designed to use a lower fixture box with an internal height of 70mm, giving room for connectors, wiring and electronics in an easily swappable module. The Macaos standard jigs is supplied with an easily removable generic upper fixture allowing for flexible placement of press pins. An adjustment screw and magnet make it possible to finely adjust the spacing between upper and lower fixtures. Static guide pin placementIt is now possible to place static (non-deflecting) guide pins at any location along the edge of the PCB. Static guide pins are useful for insuring proper placement of boards that do not have holes with an appropriate diameter for normal guide pins. Specify or edit pin coordinatesIt is now possible to modify the pin coordinates and/or hole diameter when placing a test pin. It is also possible to edit these values after a pin has been placed. The coordinates and diameter of holes for guide/support/press pins may also be edited, by first right-clicking on the pin list and showing guide pins. View opposite test fixtureWhen creating a test fixture for the opposite side of an existing test fixture, the "other" test fixture may be viewed. Note: The "other" fixture data is not saved with the new fixture. |
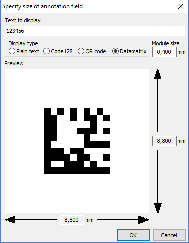
Annotation fields Annotation fields may be placed with an appropriate size for a text, bar code or 2-dimensional bar code. The Define annotation field dialog box automatically calculates the size of a rectangle for the text or bar code for a specified number of digits or alphanumeric characters, including appropriate margins. This feature is useful for laser marking of date codes and/or serial numbers. Annotation fields may be added to a new product in the Import module, or to a new panel in the Panel module. Annotation fields may also be added to an existing product with the Add Masks module. |
Other new featuresCancel symbol placementIn the Import Module, when drawing or placing a symbol, right-click to cancel the operation. |
We have the solution