Edit components
Edit components BruceComponent properties are shown in the column between the component list and the graphic viewer. Which properties may be edited depends on which level in the component list is chosen. Component properties may be edited as follows:
- Select a component in the component list, right-click and choose Edit component (or press Ctrl+E). This puts the ADM module in edit mode. Alternatively, choose Search component (or press Ctrl+O) to enter edit mode and open the component search module in a single operation.
- Edit properties as necessary.
- After making necessary changes, click on the OK buttonor press Ctrl+S to update the component.
Note: There is nothing to edit when the component class level is chosen.
Editing a component instance
When editing a component instance, the Rotation, Include in PnP output and Do not place properties may be edited. Once these properties are confirmed to be correct, the instance should be marked as Approved for placement.
Component instances which have been approved for placement display a blue check mark in the component list. If all instances have been approved, a blue check mark is shown at the component level as well.
Each component instance also displays a placement icon, based on the component layer and the state of the Include in PnP output and Do not place properties. Note: The Mounting style property does not affect the placement icon.
Editing a component
When editing a component, the bill of materials and process parameter properties may be edited.A primary goal when preparing a BOM is that each component be unambiguously specified, preferably with a complete manufacturer part number. For components (such as resistors) where a specific manufacturer is not critical, then all necessary parameters should be specified so that there will be no doubt which component the purchaser should acquire.
For components (such as resistors) where a specific manufacturer is not critical, the component may be marked as Equivalent or better by use of the check box or by right-clicking on the Alternate parts list. For these components it is important that all necessary parameters be specified, so that there will be no doubt which component the purchaser should acquire.
Once these properties are confirmed to be correct, the instance should be marked as Approved for BOM. This adds a green check mark to the component list. If all components have been approved, a green check mark is shown at the component class level as well.
Component search
When editing a component, you may click on the Search button to open the component search module. This displays relevant component properties for searching. Put a check mark beside the properties to use in your search (modifying texts as necessary) and click on the Search button.
Note: Access to the Octopart component database (through the Nexar Legacy API) is sponsored by the sales office for Macaos Enterprise users who are active customers. Macaos Enterprise EMS users and other users must acquire an API token from Octopart. Tokens for a limited number of searches per month are available at no cost.
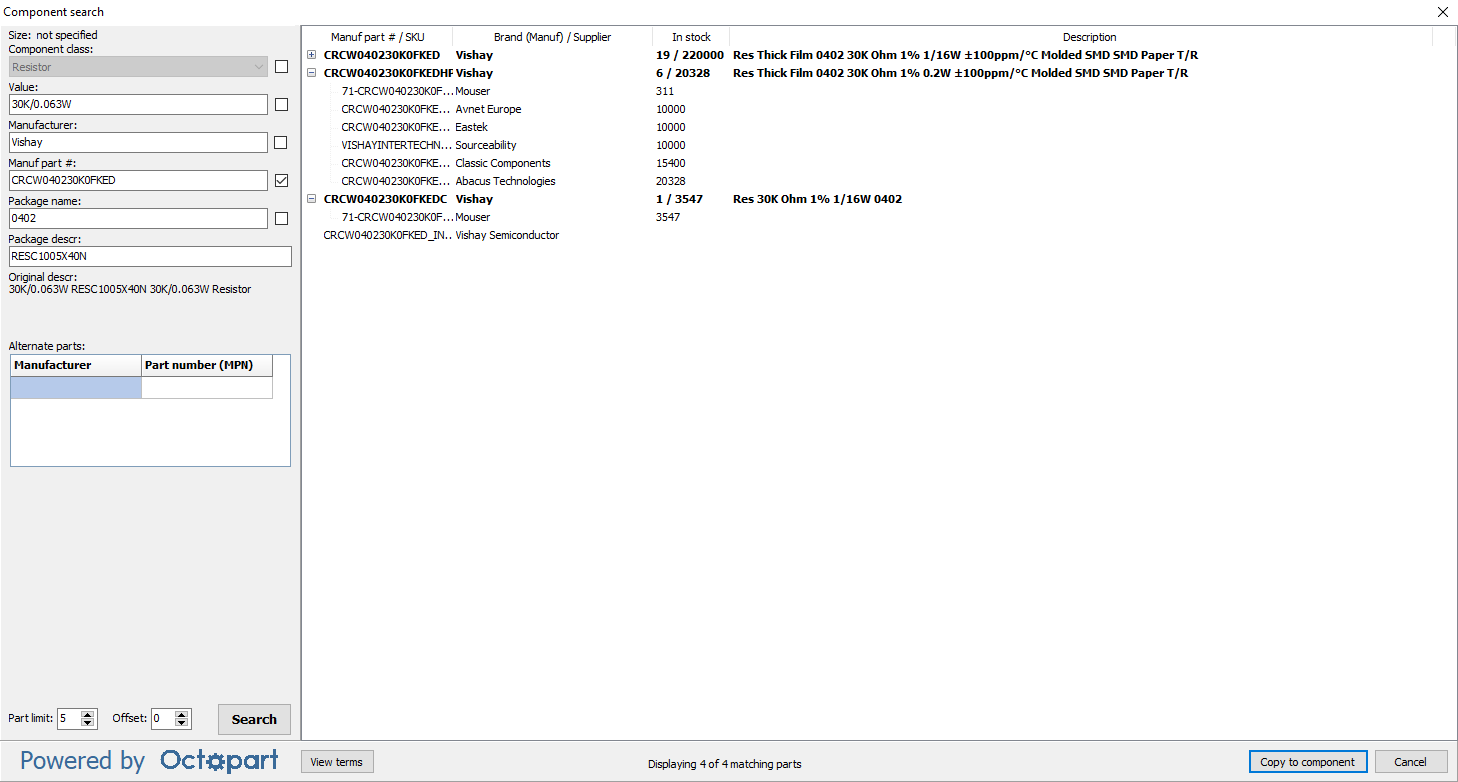
By default, up to 5 matching parts are returned in the list. This Part limit may be changed, if desired, up to a maximum of 20 per search. If more than 20 matching parts are found, the Offset may be used to specify how many parts to skip before returning a list of matching components.
For each stocked component, the quantity of suppliers and maximum inventory are listed. This gives a good estimate of the component’s availability.
With search results you can do the following:
- Set a check mark in the Manuf part # column to use the search result's Manufacturer and Manuf part # properties. The selected property values are shown at the bottom left, above the Search button.
- Set a check mark in the Alt column to add the search result to the Alternate parts list
- Right click on a search result to open the Octopart web page for the component
Once the desired Manuf part # (and alternates, if any) have been selected, click on the Copy to component button to update the component's properties in the component editor.
Additional editor operations
Some operations may be performed on multiple components. To do this, select one or more components (pressing the Ctrl and Shift buttons as necessary) and then right-click on the list.
- Edit Mounting style
- Edit Height
- Edit Max solder temp
- Change component class to...
For these four operations, the chosen property/properties of all instances of all selected components will be modified, regardless of whether selected at the component or the instance level.
- Mark status approved
- Mark BOM status approved or Remove BOM status approval
- Mark Placement status approved or Remove BOM status approval
- Remove approval
For these four operations, the Approved for placement property is marked or unmarked for all selected instances and the Approved for BOM property is marked or unmarked for all selected components.
- Mark as Do Not Place
- Remove Do Not Place
- Include in PnP output
- Exclude from PnP output
For these four operations, the Do not place or Include in Pick and Place output property is marked or unmarked for all selected instances. Selections at the component level of the list are ignored.
- Mark as Equivalent or better
- Remove Equivalent or better
- Remove all alternate part #s
For this operation, the text Equivalent or better is added to the list of alternate manufacturer part numbers for all instances of all selected components, regardless of whether selected at the component or the instance level.
- Swap layer
- Delete component
For these two operations, the operation is performed on all selected component instances. Selections at the component level of the list are ignored.
Note: When selecting multiple components with the Shift key, all instances between the selected components in the list will also be selected, even if the instance level is collapsed. However, if the last item selected is a component, then its instances will not be selected (since the parent is the last item in the selection range).